Sunday, August 9, 2015

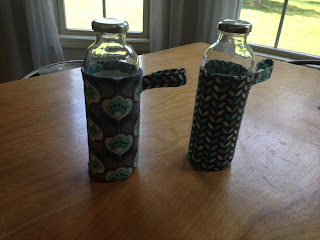
Glass Bottle Sleeve


Glass Bottle Sleeve Tutorial

Materials Needed:
1 Sheet Craft Foam
1 Fat Quarter

The bottles are Hubert's Lemonade
I took off the labels, cleaned them with Goo Gone, and took a 
Brillo pad to the lids to get the logo off.


The first step is to make your pattern.
To do this, you will need to know the circumference of your bottle and how tall you want the sleeve.
My bottle was 8.25" around. Add 1/4" for wiggle room and 
1/4" on each side for seam allowance. =9"
I wanted it to be 6" tall and added 1/4" on the bottom for seam allowance. =6.25"
To find the diameter of the circle, you take your length without seam allowance (8.5")
and divide it by 3.14
8.5/3.14=2.7"
The strap I made 7" by 2"


Cut out your pattern pieces. 
You'll need one of each in fabric and a big piece and circle from foam.
Be sure to cut out your large piece from the fabric taller 
than the pattern so you can sew it and flip it around. (Approx 1.5")

Place your main piece fabric right side down on the main piece foam.
I stitched 1/2" but you could do more or less.
Just make sure you have enough fabric to wrap around.
 Flip it up and over smoothing and making it tight. Pin around.
I serged the edges but you should skip this and baste them.
Baste the bottom edge as well.
 Pin the fabric circle to the foam circle and baste around.

  Sew the strap, turn, and topstitch.
 I sewed mine without a seam but I do not recommend it.
You should pin with right sides together and put your strap in near the top. 
Sew with your 1/4 seam allowance.


 While it's still inside out, pin the bottom circle to the bottom of the clinder.
Sew with 1/4" seam allowance around. Clip to 1/8" and zig zag stitch around it.

 Turn right side out and enjoy!
Turns out, these fit Ozarka water bottles perfect.

Monday, July 13, 2015

Easy Romper with Pockets Tutorial and Free Pattern 2T


Easy Romper with Pockets Tutorial and Free Pattern 2T

What you will need:
1 yard fabric
about 40" of 1/4" elastic
bias tape 
embellishments (optional)


Yay for summer! This is a super cute romper pattern that I made. My daughter got this fabric and some cute embellishments as a gift for her 2nd birthday and we are finally getting around to using it.
I added pockets because obviously she loves them. That is always her favorite part of anything!


First, you'll need to print out and put together the pattern pieces. It's easy- just match up the marks and dotted lines. All of the words should be facing the same way.
Then cut your fabric. You need two of each pattern piece (front and back), 
4 pocket pieces (optional), and one strip that is 30" by 2".
Skip this step if you are not adding pockets.
Pin and sew the pockets with 1/2" seam. 
Do this to all four pieces.
Mine are 7" from the armpit.
Next is to pin and sew the outside edge and pocket.
Line up the pieces front to back.
You will sew from the armpit around the edge of the pocket and to the bottom of the leg.
1/2" seam down the side and 1/4" seam on the pocket.
When you open it, it will look like this with a hole on the other side of the pocket.
I like to overlock the edges after i finish sewing.

Overlock the bottom of the legs, not cutting off any, then pin the bottoms up 1".
If you do not have an overlock machine, fold the bottoms up 1/4" then 3/4".
You will then sew 1/8" from the edge that is pinned up. (the stitching on the left)
Sew again 1/2" from the first line.
Cut and pull elastic through using a safety pin. 
I used 8 1/2" elastic.
Tack it securely on both sides.
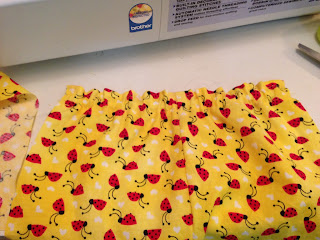
It should look like this at the bottom of each leg.
Lay the two pieces right sides together.
Pin and sew from the top to the crotch.
Then overlock.
Do not sew down the legs!
Next you sew the legs. open it up so that the pockets are on the fold. 
You will sew from the bottom of one leg, up to the crotch, and back down the other leg.
Then overlock.
Turn right side out. It should look like this.
Sew a strip of bias tape on the armholes. 
I like to use 1/4".
The neck is the hardest part and it isn't that hard..
Sew the ends of your strip of fabric right sides together to make a circle.
Then pin it to the neck. You'll want to pin the right side of the strip to the wrong side of the romper.
Pin with the seam matching the back seam and opposite that matching the front seam.
Sew with 1/2" seam allowance only on parts that are touching the romper.
Then fold the edge of the strip up and over the edge of the romper (like bias tape).
Pin just over the seam from the last step.
Pin all the way around. I find it's easiest to pin both parts by the romper, then the tops of the arms.
You will start at the middle of an arm strap then all the way around, leaving about an inch gap.
This is where you'll insert the elastic.
I used 20" of elastic.
Sew the ends of the elastic together and then sew the hole shut.
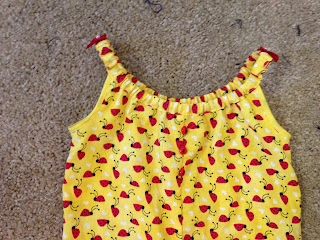
And you're all done!
You can add ruffles and embellishments if you want or just leave it plain.
I think these would be really cute pjs in something silky or just play outfits.
 I added little bows on the arm straps and the outside bottom of each leg.
I also added three little lady bug buttons in the middle at the chest.

She was mad about the photos until I showed her the pockets.