
By Lauren Mackey


Materials Needed:
Pattern ( Cut to fit you. I have added a size conversion and measurement chart at the end.)
1/4 Yard Inner Material (I used fleece)
Optional: Lace/Ribbon, Puffy Paint, other things to decorate with.
1. Cut out pattern pieces. (A,B,C)
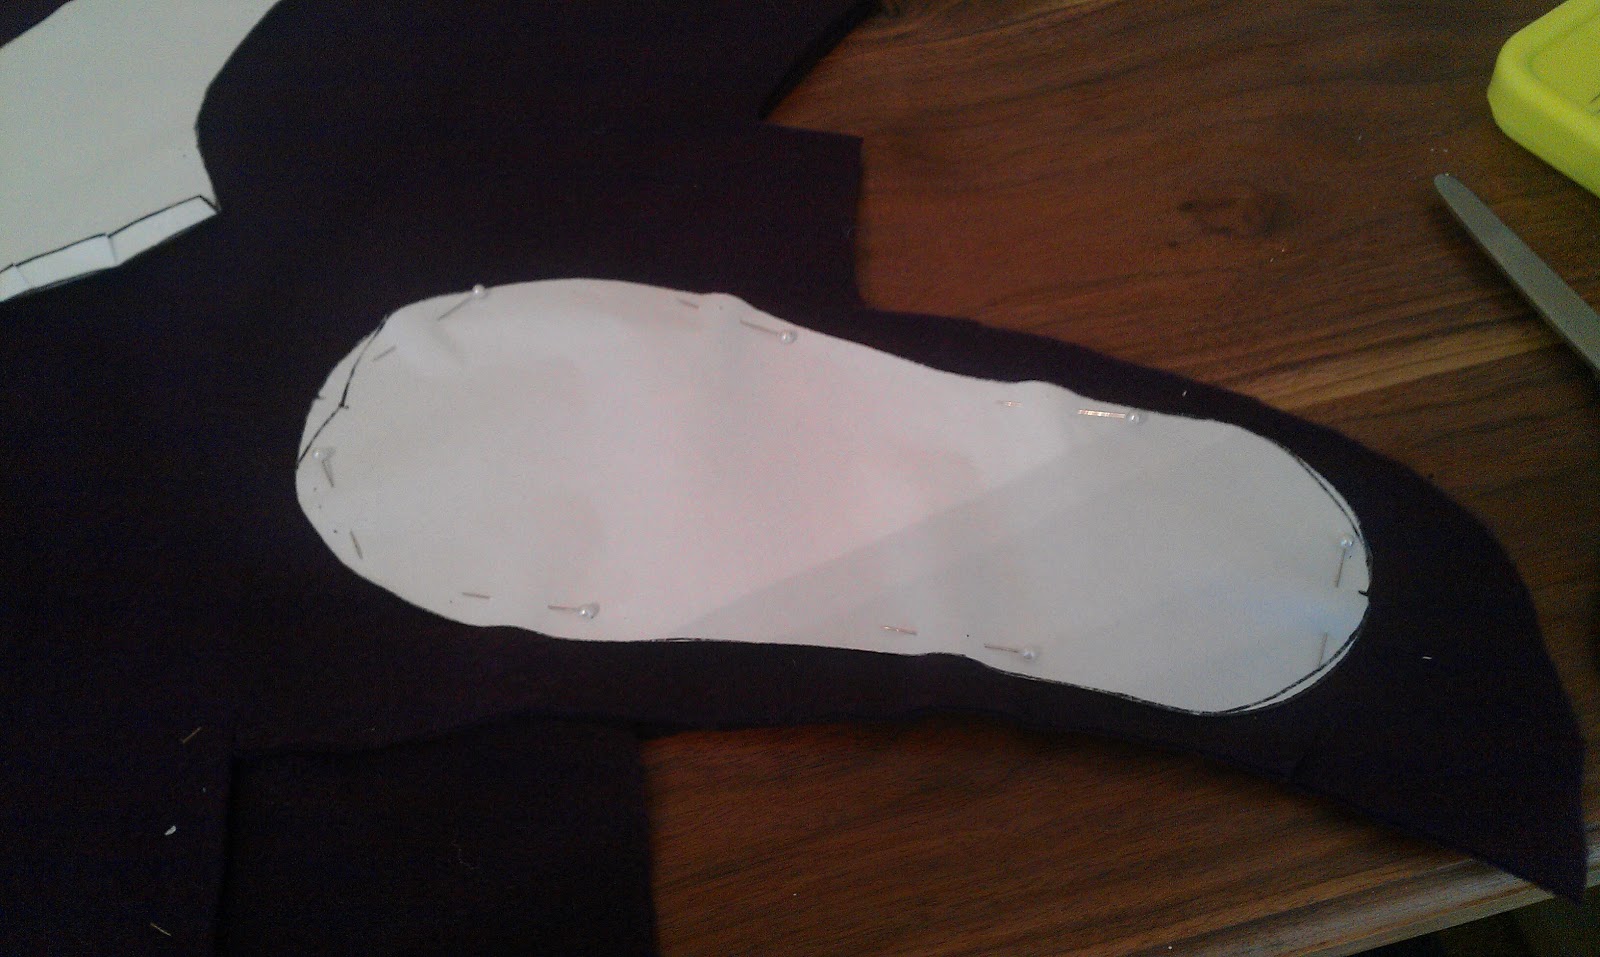


3. Sew only on the side with the concave curve. (B,C) {SEAM ALLOWANCE: 1/2 in}

4. Clip corners. (B,C)


5. Iron right side out. (B,C)

6. Pin together the straight edges. (One big and one small) (B,C)


7. And sew. (B,C)

8. {OPTIONAL} Sew around stitched edge to create a finished look. (B,C) {SEAM ALLOWANCE: your preference (I think I used 3/8 in)}

9. Pin inner material piece A to Piece B/C right sides together, matching back seam with red triangle. (A,B,C)

10. Sew from blue dot to blue dot. (A,B,C) {SEAM ALLOWANCE: 5/8 in}


11. Pin outer material piece A to Piece B/C right sides together, matching back seam with red triangle. (A,B,C)
12. Sew from blue dot to blue dot. (A,B,C) {SEAM ALLOWANCE: 1/2 in}
(should look like a tulip when you open it up)


13. Turn right side out. (A,B,C)
14. Pin inner and outer piece C to inner piece A. (You may have to work at it to get it lined up properly) (A,C)


15. Sew from as close to blue dot as you can get to edge of piece C. (A,C) {SEAM ALLOWANCE: 5/8 in}

16. Pin inner and outer piece B to outer piece A. (A,B)


17. And sew. (A,B) {SEAM ALLOWANCE: 1/2 in}


18. Turn inside out.

19. Sew about two inches on each side. From blue dot to past piece B/C, matching seams. (make sure to sew all parts that are not sewed yet)


20. Finish the seams by using a zig-zag stitch or serger. Trim.

21. Turn right side out.
22. To finish, pin and sew together toe pieces lining up seams and zig-zagging or serging. Trim.


Finished Shoe!


You can decorate and cutomize. Some examples:
I added tags to the back and puffy paint to the bottoms to make them non-slip.


Shoes on!


Hi Laurene, I was searching for a pattern of these slippers and found here. Thanks for the pattern and detailed tutorial. I appreciate your effort. I hope, I can make those as good as you have made. :)
ReplyDeleteGood Luck :)
Deletehow do I make the pattern?
DeletePeggy Nyberg, moi aussi j'ai cherché longtemps... Il faut cliquer sur le mot "Motif" au début des explications...
DeleteThis is so awesome! I can't wait to make these!!!
ReplyDeleteI have a pair of Goody Silk slippers and I was thinking that they are so very warm (and pricey!) that I would love to have another pair. Off to google slippers and then kimono slippers. Your tutorial looks so very detailed. I love the puffy paint idea.Thanks so much for taking the time to present it. Now, off to collect fabrics for a fun project - TheDiscerningDiva.blogspot.com
ReplyDeleteThank you! I loved the kimono slippers that I found online but they were way to pricy when I can sew them myself! I can make that myself for a fourth of the cost moment. :)
DeleteThanks so much for this! Awesome work. One suggestion for the lining: instead of fleece, one can also recycle and use old shirts - soft and lighter. once again, many thanks!
ReplyDeleteThanks! That's a really good idea- cheaper and easier to sew! :)
Deletehow do I make the pattern?
DeleteWhere the directions start it says Pattern highlighted in blue. Click on that and it will bring up the pattern to download.
DeleteThanks so much for this!!! Mine turned out pritty wrong, but they are still nice and cozy to wair!
ReplyDeleteThey took me quite a few tries to get right!
DeleteThanks so much for sharing your wonderful pattern!! I can't wait to make a pair for myself, and if I can master the pattern, I might make some for my nieces for stocking stuffers.... thanks again for the effort you put into creating this tutorial and for sharing it with all of us.
ReplyDeleteThanks! Enjoy it!
DeleteHey Lauren :) thank you so much for the tutorial! I will make them as a Christmas present! However I was wondering on your pattern the size 9 1/2 is that a US Canada size or is that in inches? I'm just a little confused about how to convert it... Thank you for your help
ReplyDeleteIt's a US Women's 9.5. Have fun! :)
DeleteHow do you convert the side/top pieces to be a smaller size?
ReplyDeleteI would use a scanner and scale them down. :)
DeleteOr maybe someone that has made them before has a smaller size pattern that they have made.
hi there, in the middle of making these but need more fleece, didnt account for my bog feet lol! quick question, piece a needs 2 pieces of fab for 2 slippers and pieces b&c need 4, not 2 right? im so bad with written directions im getting hung up o this lol! thanks for any input!!
ReplyDeleteYou will need four pieces of each pattern piece. If you are using the same fabric for the inside and outside, you should have four identical pieces of fabric for each pattern piece. If you are using two different fabrics (one for the inside and one for the outside), you should have two pieces of each fabric for each pattern piece. For two shoes, you should have 12 pieces.
DeleteHope this helps! :)
Lauren, I am making a pattern for a size 8 US slipper. I reduced the size of your pattern by 1/2 inch around, but am I supposed to reduce the other pieces the same amount? Sounds like a dumb question but the side and heel pieces don't seem deep enough if I reduce them all the way around. Thoughts??
ReplyDeleteYou would probably be better off making the top pieces shorter, but you'll have to make sure its still tall in the back. I would take the pattern and fold it in the middle where its about the same width. You will probably have to experiment to find the right length. Longer is always better though. :)
DeleteCute, cute, CUTE!!
ReplyDeleteI made these and love them!! Thank you for the tutorial. The only thing I was unclear about was when it said to turn it inside out lol i didnt get that i had to do the whole shoe until i saw it wasnt looking right. Lol. Thanks again!
ReplyDeleteI'm glad you like them! Sorry for the confusion, maybe i'll get some time to redo the tutorial. :)
DeleteNp, the end result is worth it. Now everyone wants some. I hope you didn't mind but I gave a whole lot of people the link to your page lol. They also loved the slippers! :)
DeleteOh I wanted to ask. did you create this pattern yourself? Im trying to make my own patterns and just wondering how you got the idea.
DeleteThat's awesome! I made it myself. I had a baby kimono shoe pattern that I loved and I wondered if I could make it big enough for me. I pretty much just traced my shoe and trial and errored the top piece. So glad you like it! :)
DeleteYou did an amazing job! I have a question for you and would love to be able to email you. Is that possible?
Deleteyes, laumack16@gmail.com
DeleteHi Lauren, I really like the shoe, but I'm having some trouble at instruction 6 and after. I have the 4 pieces of outer and inner parts sewn together at the concave part and pressed to be the right direction. (Does clipping the corners mean clip even spaces all around the concave part, or literally just clip the 2 corner edges of the concave part?). Could you help me figure out the part about sewing the straight edge and then fitting in part A to make the tulip / flower? Do I open up the 4 pieces after I pressed them and sew the straight edge with the right edges facing each other? Sorry, I'm not getting it as quickly as the others on this post. :0)
ReplyDeleteYou open up B,C and attach pieces A to each side. Right sides together.
DeleteYou are correct :)
You will want to clip as much as you can to make them curve good and not be bulky.
Hi. I love this design and am currently undertaking this project. However i am stuck at step 14, how do I attach the inner and outer peices C to Piece A? Same side opposite sides? Arggg Help!
ReplyDeleteAttach the top of the bottom piece to one side of the top. Attach C(inner, outer) to A (inner) insides together.
Delete:) Hope that helps
I just made these last night and put grippey fabric for slippers on the bottom. It worked out just great. I love them. so fun...
ReplyDeleteI'm glad that you like them! :)
DeleteThank you so much for sharing the pattern and the detailed tutorial... I can't wait to make my first pair of slippers...so needing a new pair!
ReplyDeleteYou're welcome! Have fun!
DeleteThank you for your great pattern!!!It was my dream to make my own pair of slippers!!!You can see the result on my blog :
ReplyDeletehttp://cosiadoru.canalblog.com/archives/2015/11/07/32863459.html
I love them:)
Love them! Thank you! :)
Deletewould it be terribly hard to add a no slip Sole (think thts what you call the bottom of a slipper lol) I don't wanna ruin your pattern or anything is why im asking
ReplyDeleteYou can buy non slip fabric that has the tiny dots on it, use paint like I did, add patches, or use plasti dip. It shouldn't be too hard to do any of those. :)
DeleteThank you so much for posting this pattern and instructions. I have been searching for a pattern for stitched slippers to use up my scrap fabric. Off to my bins of fabrics now
ReplyDeleteThank you so much for the step by step. I have searched all over for this pattern. I am going to make my grand kids slippers so when they are here they have warm feet. :-)
ReplyDeleteso great idea i will try it soon
ReplyDeleteargan oil bulk
I tried this out it turned out really nice! and keep it up you work very nice Thanks! :D
ReplyDeletewomens ballet flats
Thanks for your efforts!! So glad I found this!!!! Love them.
ReplyDeleteLauren, people like you who take the time to share fabulous things like this make the world a better place. THANK YOU!
ReplyDeleteThank you Lauren for this pattern, I wish you could do a Youtube video :) I am a visual learner.
ReplyDeleteThanks for posting this.. I have been looking everywhere for women's memory foam slippers that I can make on my own. Thanks for providing a step by step guide to making the most comfortable and colorful slippers for women.
ReplyDeleteHi Lauren, it is not quite clear to me if I should cut my fabric larger than the pattern for seam allowance around it or if the seam allowance is included in the pattern?
ReplyDeleteAnyhow, thanks for posting it, these slippers look really cute and comfy!
amazing tutorial, Thank youuuu!!!
ReplyDeleteBut, I´m size 6 1/2 and I have no idea how to cut the pettern.... can you help me?
wonderful its really lovely i am sure these shoes are cozy too i want to share women's custom leather shoes site where ladies can design there own choice shoe and husband can give gift to his lady.
ReplyDeleteThanks for the pattern! I love it! I made them in mustard coloured leather lined with fleece and they are so comfy.
ReplyDeleteThis comment has been removed by the author.
ReplyDeletehi, i love how these look and how simple the pattern is. i have to make independant slippers and these steps seem super easy, so ill be sure to make them for school!
ReplyDeletehi, i love how these look and how simple the pattern is. i have to make independant slippers and these steps seem super easy, so ill be sure to make them for school!
ReplyDeleteHello, thank you for posting your design and instruction for free.
ReplyDeleteWomen slipper love it,ice way to represent all this and specialty the way of tutorial many users will loved it.
ReplyDeleteI can not find the pattern. Could you tell me where it is located?
ReplyDeleteI have the same problem. Can not find a drawing or A, B and C. Would love to make these!
ReplyDeleteClick on the word Pattern, under materials needed - on first page, under the first
ReplyDeletetwo photos of the slippers
Click on the word Pattern, under materials needed - on first page, under the first
ReplyDeletetwo photos of the slippers
On the first page, look under the words Materials Needed. You'll see the
ReplyDeletefirst word is Pattern. Click on this.
THank you so much - I am getting ready for a hysterectomy and desperately wanted a pretty pair of slippers that I could wear around the house. These are so lovely and I appreciate you sharing your pattern. I hope can do it justice. :D
ReplyDelete6. Pin together the straight edges. (One big and one small) (B,C)...what straight edges, there appear to be several and what particular order? I need more specific here. If anyone can help.
ReplyDeleteI cant get this to print in the full size. This is just what I have been looking for . Thank you for your instructions I cant wait to try this
ReplyDeleteLove this patten, have made several pairs already. However I stop your instructions at 8 and then pin both the outer and lining to the outer sole (I use grip fabric)piece b first then piece c. I sew around the whole sole. I turn it right side out to check that I have caught all the layers. I then turn them inside out again, place the sole lining on top of the upper portion of the slippers so that the outer and inner sole enclose the sides of the slipper. I then sew from the outer sole side so I can see the previous sewing line, leaving open about 3 inches on the side seam for turning. After turning them right side out I just have this little seam to stitch by hand and works up so fast this way. Thanks for sharing, the possibilities are endless for styles. I change the pattern size by changing the percentage on my copier, this scales all pieces perfectly.
ReplyDeletegracias, es posibles traduccion a español
ReplyDeleteThanks so much for sharing your wonderful pattern!! but If you want to save money while shopping online stylish Designer Baby footwear visit www.shopperstrail.com
ReplyDeleteWhen cutting out the pattern do you cut on the lines, or allow extra for seam allowance?
ReplyDeleteHi Lauren, thanks a lot for this tutorial, I've been looking for a pattern for these shoes for a very long time, and there it is! You have done such a good job, it is very clear, with many details and pictures, I'm sure everyone can understand it!! I am french, so I apologize for my english if some words are not the right ones.
ReplyDeleteHave you stopped your fabrications? Your shop on Etsy has not been updated recently and I just wondered. Hope you're doing alright, thanks again
How do i get measurements of the top peices to attach to the bottom
ReplyDeleteOn the shoes sizes chart, those in Australia are not correct. I am 3 UK, 35 France, and need 5 Aus for length and 6 to get the width. Not your fault, but I thought you should know.
ReplyDeleteIs it possible to buy the pattern for the Kimono Slipper. I want to sew them in leather, but on Etsy I can´t buy the pattern?
ReplyDeletethank you
Martin
Hello Lauren,
ReplyDeleteLoved your tutorial. I will definitely try this once.
Wholesale Slippers
Hi Lauren, I love the pattern but I think I might be completely missing something as the top pattern pieces don't fit around my foot but the base does? I don't understand why though as I followed your tutorial for every step?
ReplyDeleteI got here much interesting stuff. The post is great! Thanks for sharing it!
ReplyDeleteLarge Size Womens Shoes
Hiiii. I just made these. Loved the thinking and figuring out. A bit like origami but very pleased with the finished result.
ReplyDeleteI put an insole in as I was turning it out for the last time. very comfortable
I also drew around my foot, added a seam allowance then enlarged the pattern on a photocopier until it was the right size for me.
AM SANDRA FROM CANADA, THANKS TO DR ONIHA WHO HELP ME BRING MY HUSBAND BACK, MY HUSBAND LEFT ME WITH THREE KIDS, FOR ANOTHER YOUNG GIRL, FOR OVER TWO YEARS, I TRIED ALL I COULD TO SETTLED OUR DIFFRENCES, BUT IT YIELDED NO RESULT, I WAS THE ONE TAKING CARE OF THE CHILDREN ALONE, UNTIL ONE DAY, I CAME IN CONTACT WITH SOME ARTICLES ONLINE, CONTAINING HOW DR ONIHA HAS HELP SO MANY LOVERS AND FAMILY REUNION AND REUNIT AGAIN, AND I DECIDED TO CONTACT HIM, AND HE CAST HIS SPELL ON MY HUSBAND, WITHIN FIVE DAYS, MY HUSBAND RAN BACK HOME, AND WAS BEGGING ME AND THE KIDS FOR FORGIVENESS, IN CASE YOU ARE PASSING THROUGH SIMILAR PROBLEMS, AND YOU WANTS TO CONTACT DR ONIHA, YOU CAN REACH HIM VIA HIS CONTACT NUMBER, ON CALL OR WHATSAP +2347089275769 OR EMAIL DRONIHASPELL@YAHOO.COM
ReplyDeleteHi, how do I do to get a 2 times smaller size? Thank you!
ReplyDeleteYou have shared all the points that need to considered while buying a shoe. Thanks for this information. running shoes for bunions & deadlift shoes
ReplyDeleteThanks for posting this blog, I am very impressed with your blog and it is very useful for me and other. Please visit at Bova Chelsea At Bovadistributor.co.za, Buy online for the latest Bova Workwear, Bova Chelsea Boot Black, and Bova Maverick Black Safety Boots from our shop in South Africa. Click here - https://bovadistributor.co.za/collections/workwear
ReplyDeleteThanks for posting this blog, I am very impressed with your blog and it is very useful for me and other. Please visit at Womens Shoes Australia Shop for womens shoes online in Australia. We are offering women's sandals, women boot, and women's casual shoes at an affordable price. - https://shoesales.com.au/
ReplyDeleteReally a vry nice blog i really appreciate all your efforts ,thank you so mch for sharing this valuable information with all of us.
ReplyDeleteladies shoes
I am having a difficult time understanding how to "alter" the pattern to size 8-1/2 USA
ReplyDeleteHello, I fear I may have cut the pattern pieces wrong. I laid down pieces B & C the same way for both the inner and outer fabric. I'm at part 6 where I am supposed to pin the straight edges together, but everything is a copy of each other...should I have flipped the pattern piece so I have mirror images?
ReplyDeleteOn instruction 21 it says to turn right side out. I'm confused as this would mean the stitching would be on the right side of the finished slipper. Am I doing something wrong? I would appreciate your help. Thank you
ReplyDeleteI realised my mistake in putting them together. All sorted now. Thank you for your posting this lovely pattern. Will be making quite a few more.
DeleteThis comment has been removed by the author.
ReplyDeleteThanks for sharing nice information about warm soft plush non-slip indoor slippers with us. i glad to read this post.
ReplyDeleteI really be grateful for your blog, you have completed the great job. Vero Beach Tutoring Thanks for the bunch of excellent resourceful site.
ReplyDeleteThanks for sharing this wonderful information. View this also - Damas de compañía cartagena
ReplyDeleteWhere is the pattern
ReplyDeletethank you for sharing with us, this blog is so helpful Best Sandal for ladies in India
ReplyDeleteThanks for give me information on this topic. Private tutor Alpine you have sharing very nice post.
ReplyDeleteThis article gives the light in which we can observe the reality. Special needs Tutor Alpine I like this kind of blog. Thanks for sharing informative information with us
ReplyDeleteHi My name is Rebecca.i just want to share my experience with the world on how i got my love back and saved my marriage… I was married for 7 years with 4 kids and we lived happily until things started getting ugly and we had a fights and arguments almost every time… it got worse at a point that he filed for divorce… I tried my best to make him change his mind & stay with me cause i loved him with all my heart and didn’t want to loose him but everything just didn’t work out… he moved out of the house and still went ahead to file for divorce… I pleaded and tried everything but still nothing worked. The breakthrough came when someone introduced me to this wonderful, great spell caster Dr Zuma, who eventually helped me out… I have never been a fan of things like this but just decided to try reluctantly cause I was desperate and left with no choice… He did special prayers and cast a love spell on him. Within 24hours he called me and was sorry for all the emotional trauma he had cost me, moved back to the house and we continue to live happily, the kids are happy too and we are expecting our fourth child… I have introduced him to a lot of couples with problems across the world and they have had good news… Just thought I should share my experience cause I strongly believe someone out there needs it… You can contact him on spiritualherbalisthealing@gmail.com whatsapp +15068001647
ReplyDeleteThanks! I could not figure out how to make the cut to my size, I would love an explanation!
ReplyDeleteThis article gives the light in which we can observe the reality. This is very nice one and gives indepth information. Thanks for this nice article. rhinestone flip flops wholesale
ReplyDeleteThanks for sharing this wonderful information. If anyone need to buy this fablric here is the link for buy felt fabric
ReplyDeleteI can’t believe how lucky I feel to have found your website, I just got Afoos & I didn’t know any of these things, I am crying I am so happy. Thank you ! I have also a shoes & boots collection site, you can find details about the use and all info about these shoes & boots. So please visit here: https://active-footwear.com/
ReplyDeleteGracias por compartir con nosotros este tema.
ReplyDeleteTe comparto mi post mas recientes sobre Acompañantes y cariñosas en chile
Gracias por compartir con nosotros este tema.
ReplyDeleteTe comparto mi post mas recientes sobre Acompañantes y kines en lima
Cool
ReplyDelete